Showing posts with label dying. Show all posts

Tuesday, October 20, 2015

Stitching on squished flowers

I think the pandemonium is over for now. Or perhaps there won't be anymore, which I prefer. The memorial for Steve's mom is over and we visited with 41 family members in 2 1/2 days. We ate five huge meals, Steve and Lucas escaped to Starbucks 6 times, and there was way too much wine poured and consumed.
Judy's ashes are in the cactus cookie jar. A cousin of Steve's made the floral arrangements along with the food and drinks at the wake. Many thanks from all of us here, Denise.

I have been sewing on this project for the last few weeks.
You know, it must be this program, not the camera. I just went through all the photos and this one was very crisp in the ViewNX program. It is boring as hell here. Sheesh.

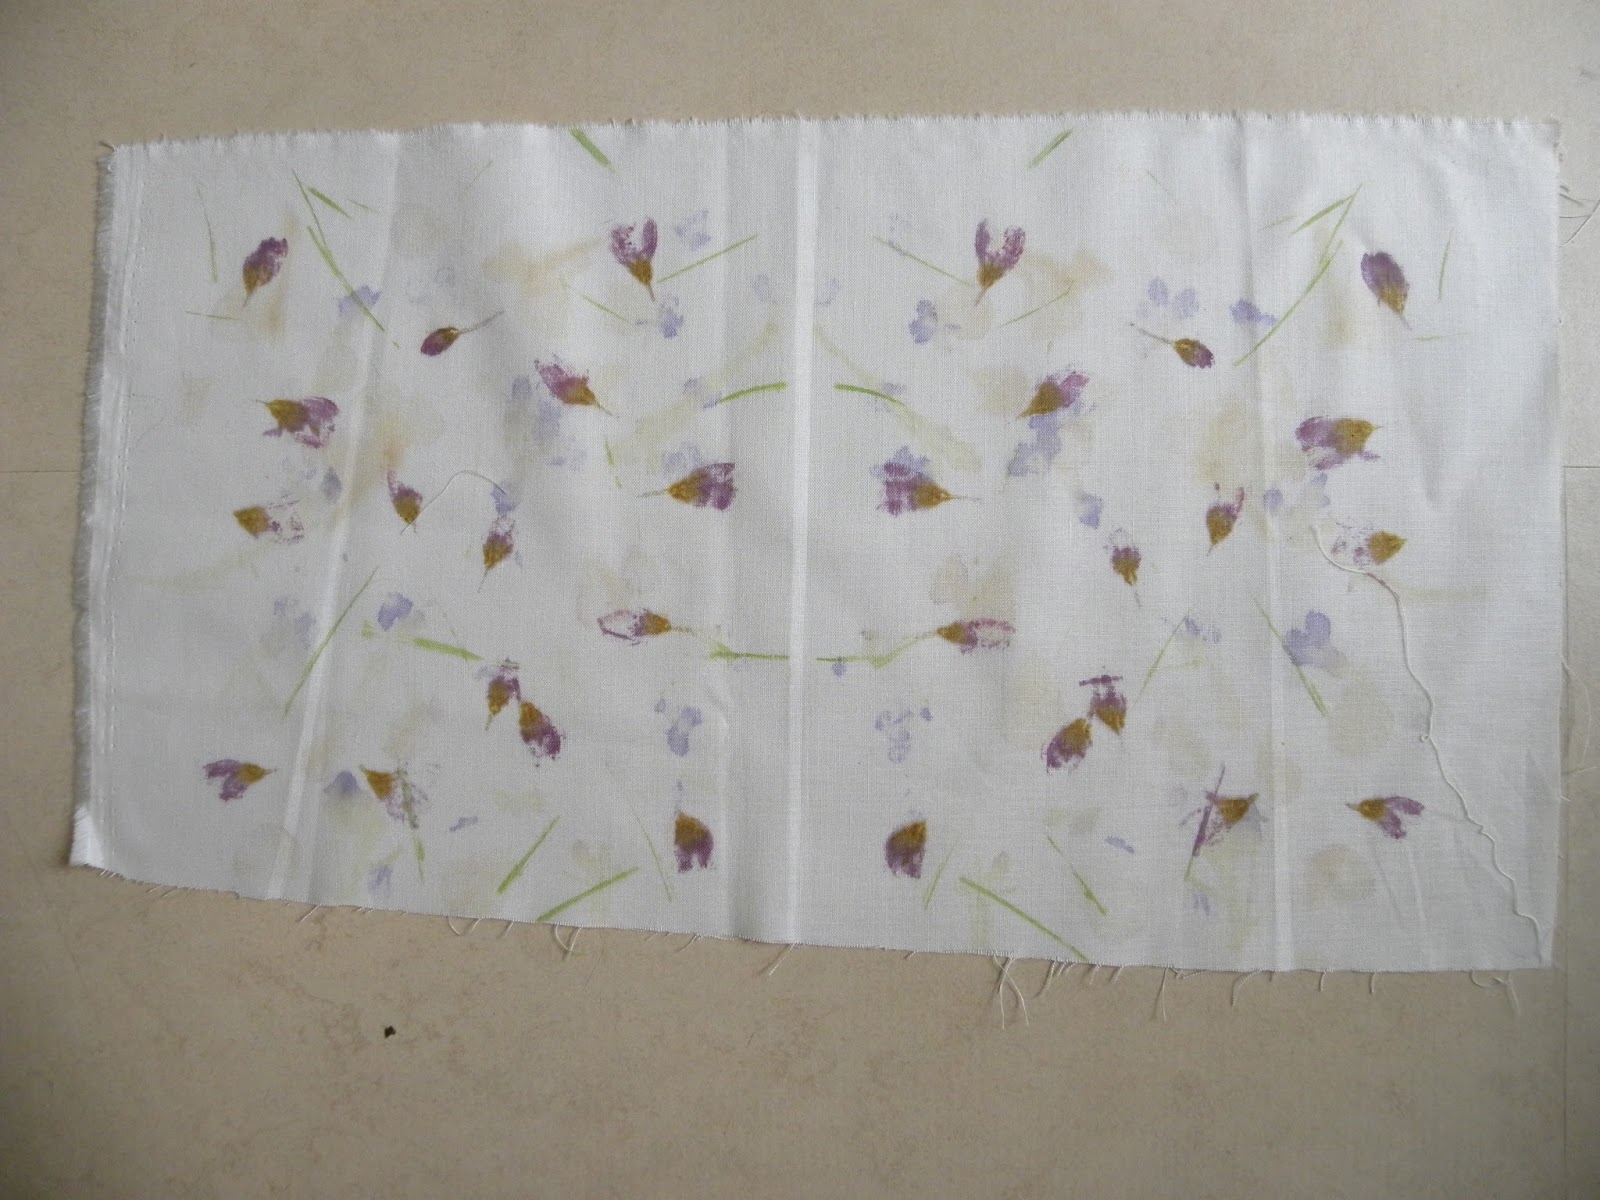
The fabric was made over the past two summers, when I used a rolling pin to squish grass stems, leaves and various flower petals between two layers of fabric (mordant with alum). I used the fainter lines to stitch 'grass' and the larger blobs to add some floral stitches. There is a lilac coloured curving line from the bottom left (yours) to the top right. I have begun to add lace and expand the area of stitching. I think it very pretty and it is certainly relaxing to work on. Let's try another photo.
Hmmm.

Laureen, it's time to accept the reality that white fabric background is gonna flunk the photo standards. But the stitching won't.

Tuesday, June 2, 2015

Floral mark making

I have an ongoing project to see what dyed colour I can get out of my garden. I have shown dyed wool before with forsythia, chives, and I forget what else. Last summer I planted woad to get blue, but it didn't take. It is growing this summer, so blue is in our future.
Three years ago, I started squishing flowers and leaves between folds of fabric. The first year I had some lobelia and small pansies. There were also a few rose leaves on the ground at the neighbours. I placed them between some unbleached muslin cotton and used a marble rolling pin on a hard surface. 
Goosh!
 
At the time, a lot of people were, and still are, wrapping fabric around earthen elements. Mud, bark, leaves, rusting things, and stones are popular. Not having anything to hand except oak leaves and a smattering of flowers in the garden, I thought I'd try seeing what dye stuffs came out of squished plant life. Also, having no patience for the time it takes for fabric to take on the stains from wrapping and waiting, squishing seemed to suit my personality better.
I didn't have this brainstorm until the end of the summer, so I had missed most of my floral opportunities.
2nd year with rose petals and lobelia stems.
The second year I managed to remember a few times and added a beige and white cotton to the experiment and a pure white cotton.
2nd year with cut up rose petals, lobelia stems and this years cherry flowers just squished.
This spring, actually last week, I took all three fabrics out and cut some blooms from the forsythia, the flowering crab and two dying yellow tulips. I had a Lady's mantle leaf and some accidental grass strands.
2nd year with this year's forsythia blossoms and its leaves
I have tried to keep a vague colour scheme on each background; purples and red, purples and yellow and yellows.
The addition of the grass bits, scattered by holding the grass about 10" above the fabric and snapping them out from between my fingers led to some lovely marks.
I am very happy with the green bits.
Once everything was squished, I was struck by how lovely they turned out. I expected I'd be squishing all summer, but I think each fabric is done as far as this step is concerned. 

Forsythia, lobelia, something purple from last year and grass.
beige-ish background with lobelia, grass, roses from last year and pansies.

I particularly like the lobelia, cherry flower and grass combination.
I iron the cloths with a very hot iron. They all need damp stretching to get the fold lines out. I have pulled out some more white and muslin and am going to see what else I can squish this summer. I missed roses last summer, and I'd like to see if I can get hold of a variety of dahlia petals. I wonder if I can sneak some from the Public Gardens Dahlia display? I might have to creep in after midnight. I could rent a Cat Woman outfit and buy that thing-a-ma-bob for seeing in the dark. The things we do for our art.

I am happy to get any ideas you may have on how to approach stitching these cloths. 

Monday, July 8, 2013

Rolling Pin Project continues

Johnson Blue Perrenniel geranium (left front), red dianthus (left back), blue flower, I forget (left back-most), Stella D'ora daylilly (right front), Lady's Mantle (right back)
Many people are putting leaves, twigs and fallen debris into water, and soaking cloth in the mixture for ages to see what they get in the way of dyes. That takes too long.

I've been taking the leaves and petals off plants in the garden, tossing them onto cloth and then rolling the hell out of them. Completely different work ethic (barely there), completely different colour results (there's colour instead of shades of brown) and completely different plant matter (twig/leaf vs flower/leaf)

What follows is a short photo essay on how I did things. I used a very hot, dry iron to set the colour when I was done. No washing at all. I haven't put anything in a window to test for colour fastness yet.

Dianthus petals and chopped stems, Mollis leaves. Lay on one half of textile.
Textile folded in half and rollered. The big purple blobs are from iris leaves done in the spring with the same method.


Neither the Dianthus petals nor the Mollis Leaves did anything noteworthy. Onwards.
Johnson's Blue Geranium petals.
Mirror images happen by laying the half of the textile without floral matter on top of the textile that does. It doesn't always come out this neatly, because things squish around a bit. If a mirror image is not what you are seeking, then lay the top half textile at an angle to the bottom layer.

Mollis before rolling pin.

Textile after rolling the Mollis.
Geraniums, Dianthus and stems.


After smooshing.
Day Lilly petals, torn.


Mollis added partly through Day Lilly layering.

Day Lilly and Mollis.  You can see from the (your) right side, that I folded the cloth on an angle, so as to avoid a mirror image.
The thinner the flower petal, the less colour will come out. Yet the thicker the leaf, the less colour will come out. Sometimes you can get more colour by snipping the leaf or petal with shears, rather than by using them whole.

This is my usual random, haphazard approach. Someone with more patience could try for pattern repeats or compositions. I dropped and rolled. Sort of the way they tell kids to "Stop, Drop, and Roll" when you are on fire.

Tuesday, March 5, 2013

Weekend Away and stitching

We went away for a brain draining weekend, meaning the goal was to think of nothing that required a decision beyond "Wine" or "Scotch"?


Before we left, I did a quick wet blocking of my latest stitching for a new embroidery piece, (as taught by the fabulous Karen Ruane)  I will do a more detailed report on this next Monday.

I also managed to squeeze in my version of dying with plants. I've been watching others who patiently tie or bundle up their cloth and let is soak for ages and ages and ages in murky baths of fallen debris. Everyone is getting lovely earth tones, or rusted bits (thank goodness dead animals aren't part of this decaying process) but, being an impulsive and impatient sort of soul, I did things my way.


First you take a flower, then you tear off the petals, scatter them across your cloth, then fold the cloth in half. Then you take a heavy rolling pin and roll the heck out of the fabric. The top and right hand textiles are with a dark red rose, while the bottom left (your left) is from several geranium petals and some grass. I like this piece the best, the colours are more natural in shape, the green is fun and there is a nice variety of saturation. The red rose had huge petals that disgorged next to nothing unless I snipped them up a lot. They are too angular. The leaves yielded nothing. I think these semi fake roses are just too close to plastic to be worth pursuing although the large petals should have made great blobs. This is going to be my summer dying project, along with two lichens I have stewing, to just roll the hell out of fallen flowers onto cotton and see what I get.


Steve really was intrigued by the rolling of the textiles but he also wanted to get on the road before the snow came in.

I read, spun, played the recorder, and sew upon Mom's birthday quilt.


I am pleased by these first steps, I hope to have the blocks assembled by her birthday, but probably not the borders.  There was a lot of jumping up and down between the ironing board and the sewing machine but there was lots of room to move about. My own home would require stepping over one or two cats, numerous electrical cords and the bills I am ignoring.


Steve played his banjo (a lot) and did his usual fabulous cooking. We walked a little bit, but luckily the weather wasn't really nice enough for long walks, so we could return to assume reading positions.

Now back at home, we are returned to the normalcy of life. I have begun a painting course with Carla Sonheim (more on that also next Monday) and went for my second huge walk for chores since the concussion. I have my first shift at the Out of the Cold Shelter in two months and I'm glad to be getting back to that work. It's a bit drippy outside and that means spring is thinking about returning.


Monday, February 11, 2013

Black Bean Dying with Wool


I decided to do some dying with black beans. Why? Because if Woman With Wings can do it, so can I. Here is her blog address for this and other interesting adventures. Search for Black Bean Monday.


Woman with Wings soaked her dried black beans for 24 hours in water, and her animal fibres in an alum mordant for 18 hours. For her plant based fibres, she soaked them in soymilk and water for 18 hours.

Naturally, I didn't follow instructions, but they were a bit vague anyways. My excuse this time is that I had a concussion and following instructions was a challenge.


I filled my dye pot about 1/4 full. It has been used with commercial dyes in the past, so I did not keep the beans for a soup or stew as Woman With Wings suggested. I chucked them in the city compost. I soaked the beans in front of the fireplace while the fire was going for a total of 12 hours and at room temperature for a further 10-ish hours.


The natural yarn (as in natural colour), probably Briggs and Little, I soaked in tepid to room temperature water, with alum and a good-for-the-environment dish soap. This lasted about 5 hours, when I then forgot to wait the other 13 hours and dumped it out. I re-soaked them again for 2 hours the night of the dye experiment.

Into the pot went 3 cups of the water from the beans, with 2 cups held in reserve for the cottons. I did not dilute the bean water. I scooped two skeins of  wool over from it's soaking bath, and then brought the two up to med/hi. Everything was stirred several times. Once it reached the state of 'ouch', I reduced it to minimum and let it simmer for an hour with a few stirrings.

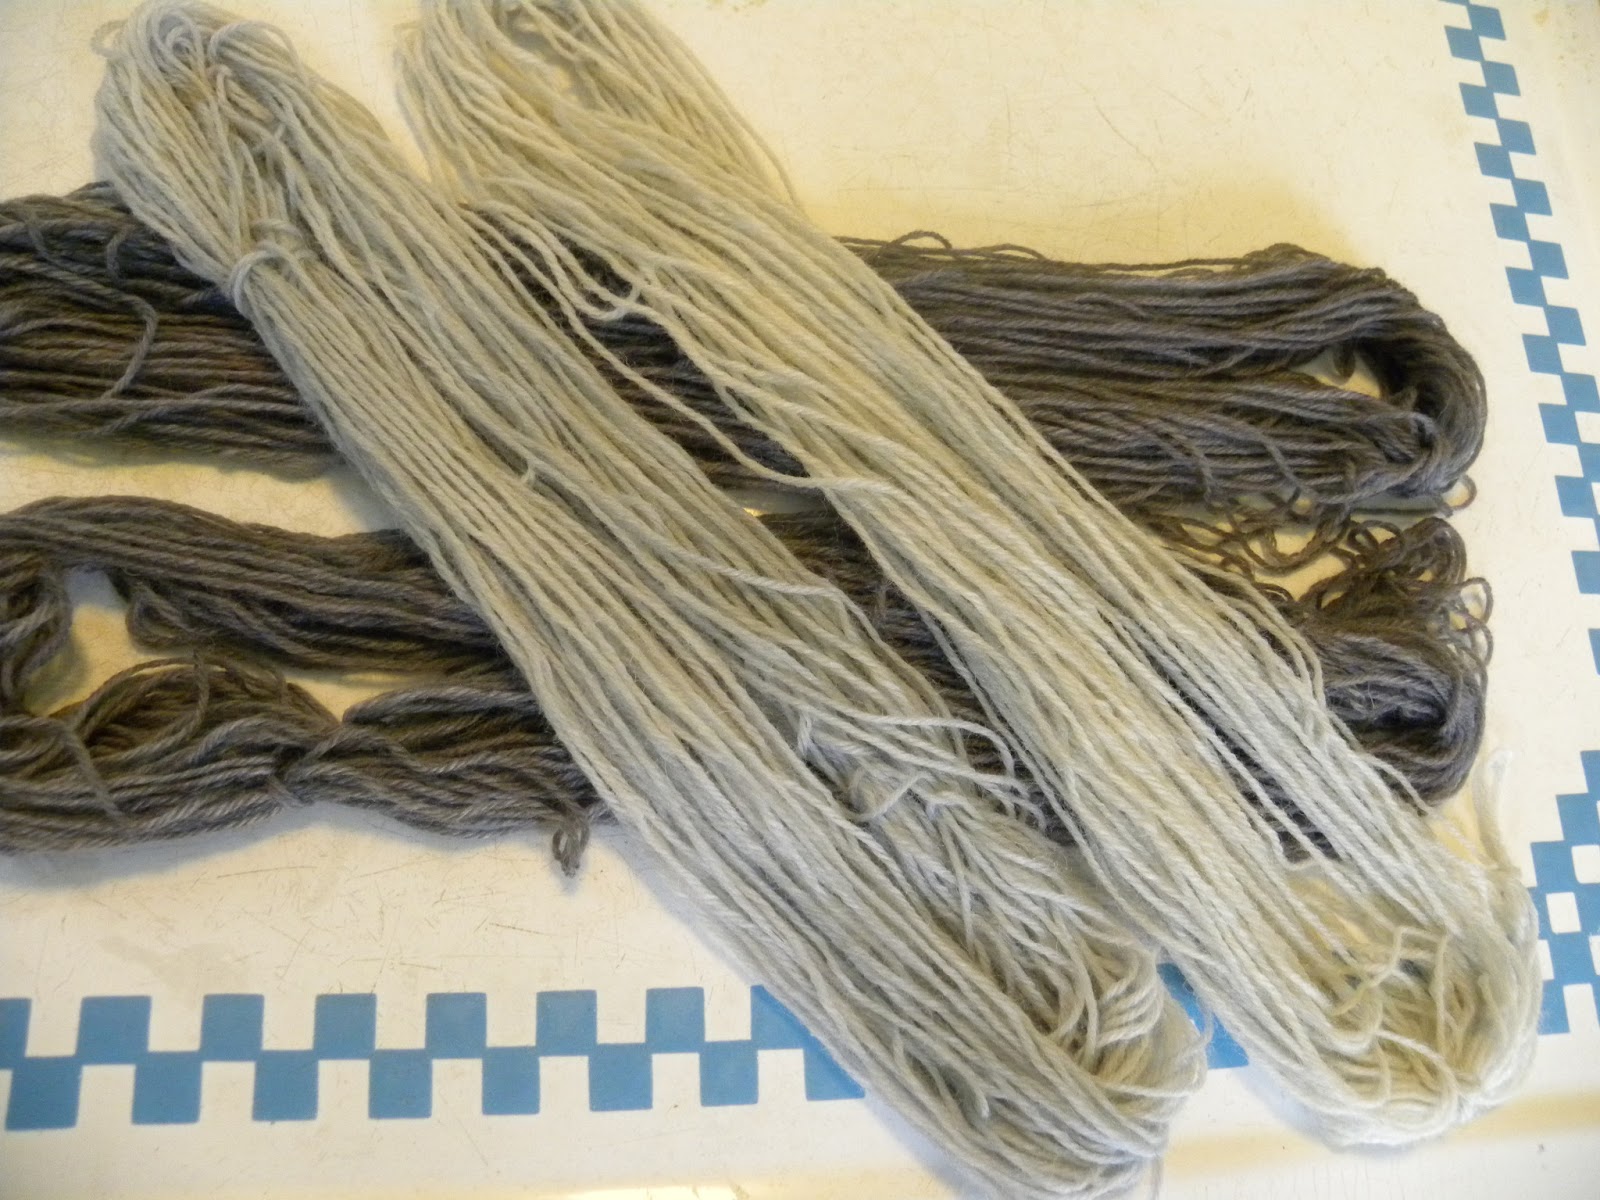
I decided to let the combination of wool and water cool to room temperature while I searched my memory on what happens with the bottle of vinegar that I knew I needed to use. I put two more skeins of the natural coloured yarn into the slightly exhausted dye bath. One skein was sort of squished down, with bits left to float while the second skein was dipped into the bath and allowed to float on top of the lower skein. A vinegar bath later and these are the results.


In real life the darker two are a sort of indigo grey, the middle skein is headed towards a bright indigo and the lightest skein is disappointing. It is dyed just enough to be neither a clean cream nor a light blue or grey.  More as if it had been dropped in the ashes.

Because the last skein disappointed me, I decided to go a bit further. Woman with Wings makes a reference to dying with soy milk as a mordant. I couldn't find any details about it, it will be my next foray into excitement, but in the meantime I plunged the lightest skein into 200 ml of soy milk and water, let it soak over night. As well a bowl of 1 cup of beans was soaking. I redid the dying process. The top right ball is the soymilk + alum + vinegar + black bean result. It is a softer grey and looks a little more deliberate than dirty.


I am nicely surprised by the results and think it is worth buying another bag of dried black beans to do again. By then, I hope to have found better information on the soy milk as mordant process.

 My soy milk as mordant research has led me so far to this, if any of you want to continue along the path before I get to it.

Talk about methodical ! Turkey Red Journal has all sorts of numbers and consistency going on there. And good photographs. It is very inspirational, especially if you like measuring things.

Monday, January 28, 2013

A little more LaLa

Well, I'm really not supposed to be here, so ssssshhhh, don't tell Steve.

I've been keeping busy doing small chores. This is a doll blanket made for my mom, Riky, when she was a child in 1945. It was made by an older sister for St. Nicholaas Nacht and the material is parachute cloth. It is from the parachutes that dropped supplies into Holland as Liberation came closer. I played with it when I was little, then my daughter played with it. I snuck it away from her when the doll toys went into the attic. I was worried mice might discover it. Since then, it has hung on my studio wall as a reminder that loving items can be made from some creative efforts in times of need. The blanket had some small holes and a ripped seam. I added some yo-yo's to cover the holes, hemmed the seam and added a proper sleeve so it can hang straight.

I began this shawl before  Christmas and had only a few rows done before my klunk. I've been slowly working my way along, the lace strips require some counting and attention to additional stitches. The curved edge will eventually be the hypotenuse of the triangle shape. It is made from a lovely commercial tencel/merino single ply that I purchased.
Detail of lace section. Knit two together, yarn over. Increase at the beginning, 2 at the centre and end of each pattern row, Purl back.
For my next trick, I found the idea of dying fleece or yarn at this site:
http://womanwithwingsblog.blogspot.ca/2012/03/black-bean-moonday.html

Woman With Wings has several pictures of the process and the end products. She has a very nice blue. I am not sure how colour fast the beans will turn out to be or if she finished things off with a vinegar bath. I will keep you all posted over the next week as to how this goes. Woman With Wings took the beans at the end of the soaking and froze them for a soup later on, but I didn't think of that. I am using a pot that has had dyes in it, so I will chuck the beans out, just in case.

My next project for dying. These are black beans, soaking in front of our fireplace. One cup dried black beans, 4 cups water, room temperature for about 24 hours. While this is going on, I am soaking some natural coloured yarn in alum and dishsoap (without scent or bleaching agents)

The cats and my son find this very peculiar to have in front of the fire. Wait till they see what's going to happen with the lichen I have stashed in the cupboard!

 That's it for today. I hope to be back again a couple of times this week, with a dying report and a special on my sister's developing 50th birthday present. Yes, there will be spoilers, so Sister, if you don't want things spoiled, don't read those posts.On the other hand, if you want to give input while it is in process, this will be your chance.


Sunday, August 1, 2010

Dying with Chives and Golden Rod

Most of the silliness is gone from my process of dying with plants found in my own garden. I am still putting the plant matter back into a colander and putting it back into the dye pot just because I haven't found anything to reassure me that the plant matter isn't needed. Looks like I need another resource book.

I did go to Joybilee Farms for entirely different reasons and she mentions that she lets the dye liquor ferment for a few days, build up a few bubbles before adding the wool. I did try to do something along those lines, at the end of the Golden Rod experiment.

http://joybilee-farm.blogspot.com or www.fibrearts.ca

Chives: Little Buggers.

I cut up more than 6 cups of chives, using my cup measurement method as opposed to the more normal one of using a scale of grams or ounces. I figured the same method should be used through out this process to be consistently wrong. The ratio of chives to wool was 3:1 and I had 2 cups of wool meaning I needed 6 cups of chives.

I soaked the wool as usual, did the whole routine as usual and look at this!

Nada. There isn't a drop of colour. I checked the book, Spectrum, Dye Plants of Ontario, edited by Nancy J. McGuffin, and my plant parts were correct (leaves) and my ratio was correct. I confess to a complete brain cramp. Once I had tidied everything up and started to write my notes I thought “Did I use Alum or Copper” I forget. I think it must have been alum because I don't remember having to pick chives out of my copper scrunchy. How do we forget things like this. It is sort of important. Never the less, that piece of information is gone. But since I didn't get any colour it hardly seems to matter.

The Burr House dyers group had their problems also. Here is an additional comment they made:

“The colours from the original dyebath of 1:1 ratio were pallid. A stronger dyebath was used in an iron pot and the skeins re-entered. Very strong rich shades resulted. The ammonia rinse gave an extremely deep golden yellow.”

I did not do an ammonia rinse, because I thought I had no colour to begin with and it wasn't until re-reading this book for the umpteenth time that I saw this sentence. To confess to my deep ignorance, I didn't even know you could still buy ammonia, I thought it was no longer on shelves because it is so toxic. Guess I need to go shopping.

Golden Rod: Great weed

An entirely different experience happened with the Golden Rod. First, I had way more fun collecting it. We were in Pugwash at a friend's cottage and she has a field of it, so out we trotted and gathered a bag of the stuff while the white wine cooled. It counts as growing in my garden because Steve designed the cottage and we've been visiting this site for two years watching this building grow. I have a bunch now growing in my own garden for next year.

The Golden Rod is hidden behind my hat.

The next day I made the liquor up. My mom, who was visiting for several days, was horrified. It was very hot in the house, a Maritime heatwave (3 days) was in effect and the fans were a churning. Plus we were having guests that night and Golden Rod is nothing if not stinky. We left it out on the back porch to cool and de-stink. It cooled, but never de-stunk.

Same usual mayhem in the dying of the wool but this time out came a rather interesting green. Alum and Golden Rod give a green that looks like it is soft but then you realize it is holding its breath trying not to let you know it is having a PMS experience. It is an angry soft green. And a little stinky.

I still had lots of the liquor left over and had a brain wave. Why not toss in some carded fleece? I scrunched in 4 small batts of the carded fleece, layering a rag of cotton between them in case they matted together. I put it out in the back yard, lid on, in the bright sun so it could cook. Then it rained and I heaved it into the back shed. Then I forgot. Then we took it out and gave it a rinse in the kitchen sink. Everyone fled except me. I had to see this through.

The unspun fleece is from that sleezy sheep Floozy I told you about a few months ago.

It starts out as an oatmeal/taupe and with the golden rod, it looks like an oatmeal taupe that cats peed on. The awfulness of the colour is not showing on my monitor. Squeeze your eyes while smelling vinegar and anchovies, you'll get the idea. I need to spin a few metres to see it is as awful as I think it is. One of the challenges is that it stinks too. The cats are very impressed. It is a full open-mouth-whiskers-straight-out-ears-back kind of stink. I am keeping it on the back porch in case the cats think it really is another cat's markings and they decide to join in. I think some Eco-wool or Woolite is in this fleece's short term future.

The future dying adventure plans include carrot tops, rue and fern bracken. I am tempted to try some Sunflowers and the Smoke tree. The Sunflowers I didn't grow myself so that seems a bit of cheat given that I wanted to use plants that were in my own garden and I can only buy them. I will have to ponder the ethics of that. The smoke tree in my yard is still a baby and it seems kind of harsh to prune it. Another dilemma. Would it be a cheat to use someone else's smoke tree twigs instead of my own? Anyone have a smoke tree to tempt me with?