Showing posts with label weaving. Show all posts

Friday, October 7, 2011

Photo Essay of Pseudo Weaving postscript

All that loom preparation had to lead to some sort of weaving, no? And for a change, it did. I had warped this scarf before I learned about the pseudo warp method. I had originally intended that the scarf would be 100 inches long. I had warped an additional 32 inches for the waste that usually occurs. With the pseudo warp on, I wove and wove. The scarf turned out to be 91 inches long plus fringes. Perhaps a bit long, unless I decide to wrap it around my neck a couple of times. Since there is mohair in it, it will be very warm and snuggly on cold days.

Whenever I prepared a warp, I was always grumpy about the amount of lost threads. I would weave until there was barely a shed to get a shuttle through. That rarely worked well. With this pseudo warp, I was able to easily! weave until the knots came up close to the heddles.
Feeling smug...
I eased the knots through the heddles, and trimmed off the scarf where the pseudo and real warps were tied together.
Fun surprise! The knots didn't careen through the reed, but stayed nicely behind it.
I was then able to easily cut off the knots from the scarf's fringe.

If I had done two things, I would have been set up to tie on a second scarf warp.

What I didn't do was 1) make the pseudo warp long enough to come a good distance through the heddles - and the reed - and up to the breast beam. In other words, those very first threads should have been 32 inches plus another 24 inches or more, if I wanted to keep reusing it. 2) was not supporting the lath with the pseudo warp before trimming the scarf off. It all crashed down in the back, the heddles were un-threaded and now, not ready for a new scarf. Live and learn, as always.
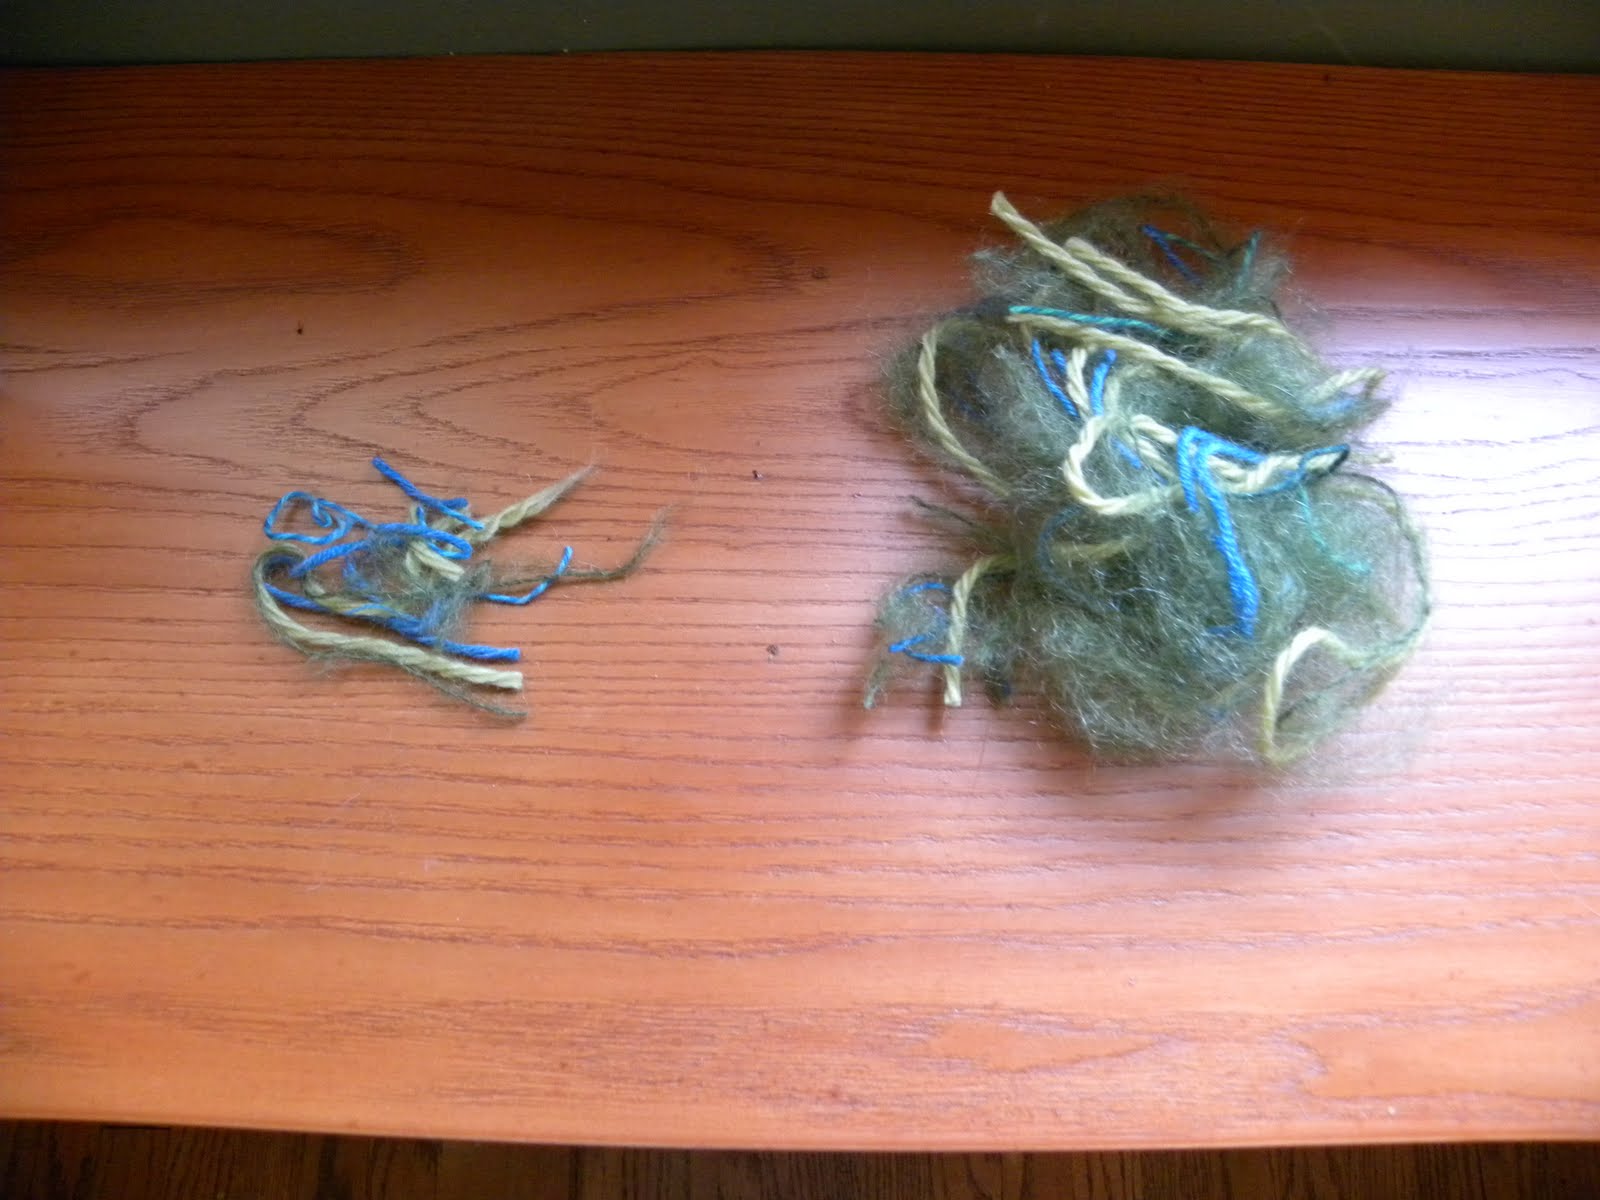
And for those doubters, this is the final amount of waste from the project, the knots of the pseudo and real warp, plus...
the trimming from the set up process. Combine the two photos and we have less than 4 inches of waste from start to finish. I repeat - gloat in the savings.

Thursday, September 29, 2011

Photo Essay of a Pseudo Warp for sticky threads and more

taught by Janet Stafford....as interpreted by Laureen van Lierop....(all mistakes are mine and there are a few)

First create a Pseudo Warp. Begin with measuring the distance between your back beam and the space between your reed and breast beam.

Using a coloured cotton, cut a length double this distance. (I didn't cut mine long enough and it became annoying)

You need a rod or a wooden lath that is attached (eventually) to your existing back beam. It needs to be several inches wider than the proposed project or slightly less wide than your back beam's rod and not flexible.

Using a half hitch, each length of coloured cotton is secured to this wooden lath. You now have two pseudo warp threads (because the thread was doubled). This threw me off. I had cut 80 threads because my project had 80 ends. Nope. Cut 40 threads. Doubled and these will make the 80 needed.

Once all the threads are half-hitched to the wooden lath, secure them into place with tape so they won't slip. I forgot to do this (mistake #3) but it worked anyways. Attach the wooden lath to your loom's back beam rod at either side. In the middle too, if you wish.
Thread the coloured threads through the heddles in the desired pattern. I used a plain weave. Keep it simple when learning something new, I think.

Tie your threads up in groups as you normally would. I tie mine up every inch worth.

Some of you will thread your heddles with the reed in, some of you with the reed out. In either case, it is time to make sure the correct reed is in place and sley the reed.

Again, tie your threads up in your preferred way. When everything is nicely sleyed, take the time to undo all those threads and give them a trim across. Why? When it comes time to get the upcoming knots through the reed, you will want them in a nice straight line rather than higgeldy-piggeldy. Keep watching.

The real warp now makes it's appearance. On either side of your loom, put in place a securing string for your lease sticks. Slip the lease sticks through the first securing strings, then through the warp at the usual cross. On to the second set of securing lease stick strings and tie the lease sticks so they don't fall out. As mine did.

The cross is secured by the lease sticks. It is safe to undo the strings holding the cross in place. I didn't believe it could be true, but ultimately, it turned out to be the moment to trust the instructions.

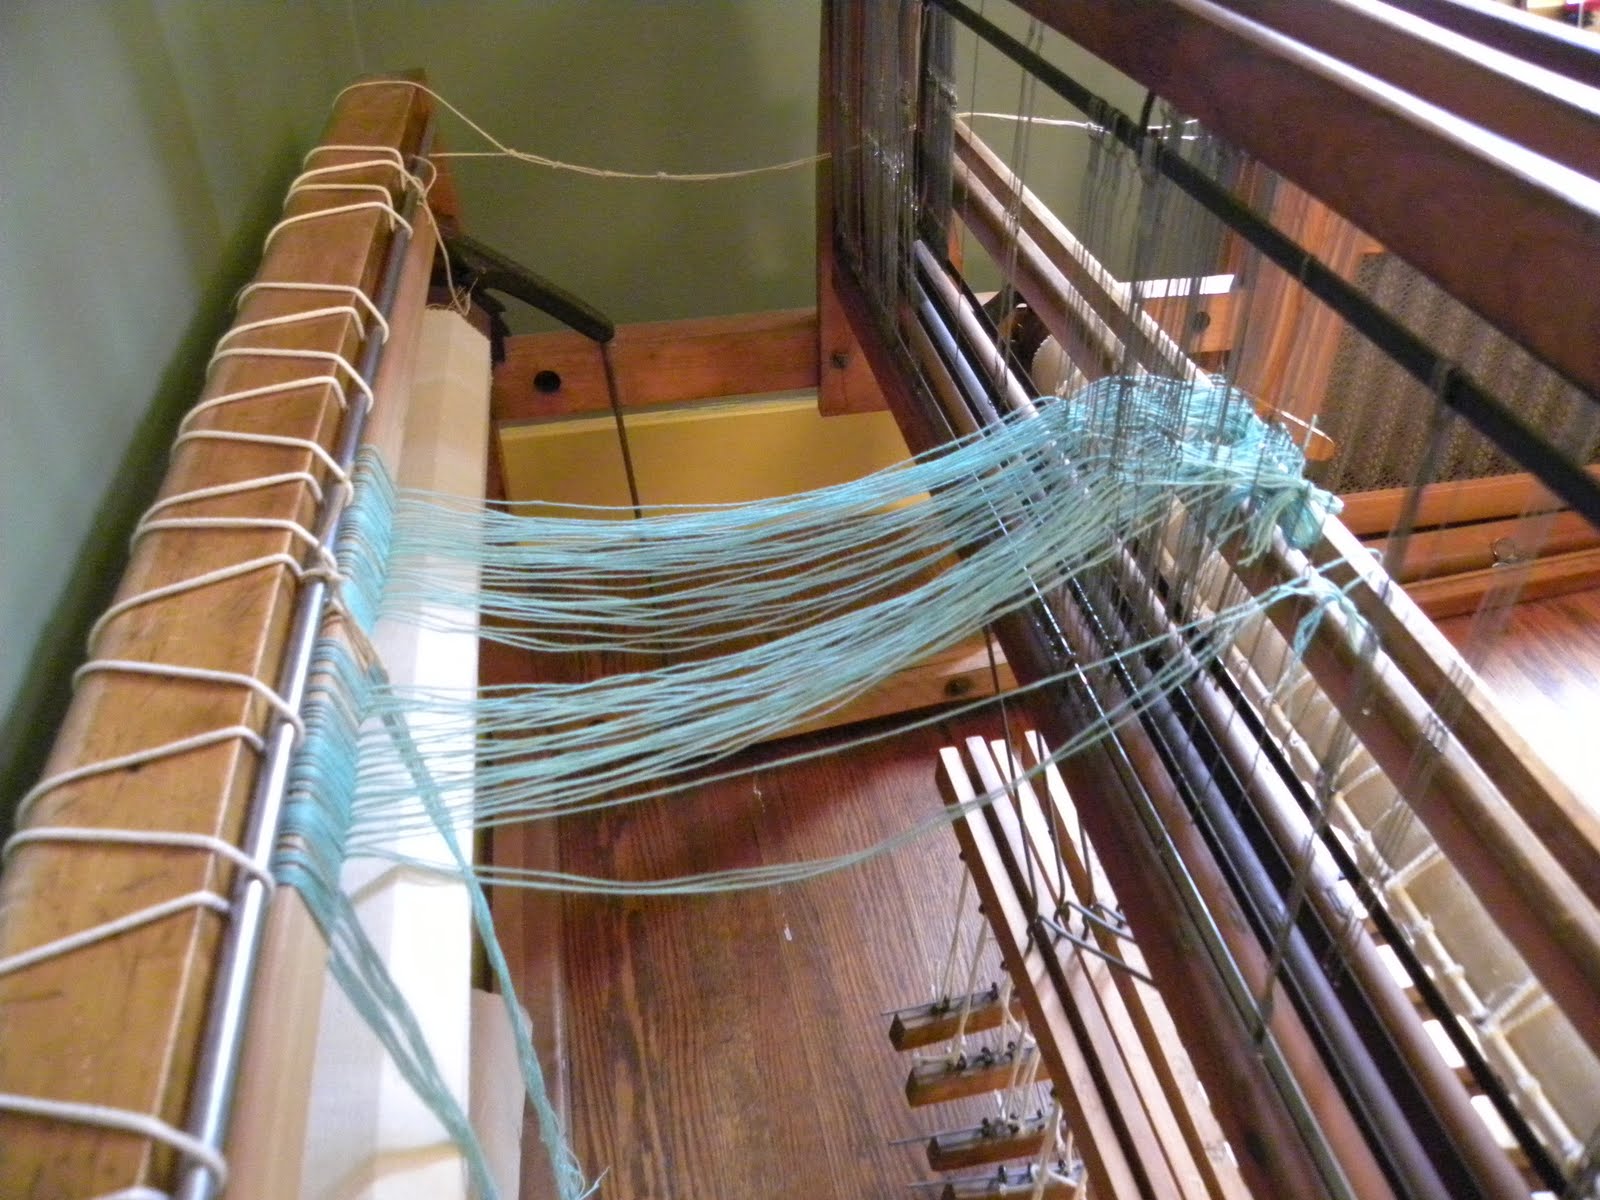
Taking a group (about an inch worth) of real warp threads in your left hand, tie each warp thread to the appropriate false warp thread. First warp thread on the first false warp thread. Work in small groups because all those threads can be a bit of a muddle until you get a rhythm going.

I held the ends of thread (warp and false warp) evenly together. Then I tied an overhand knot. I don't know how to explain it. Maybe someone else who was there can step into the breach? 80 knots later, I was done.

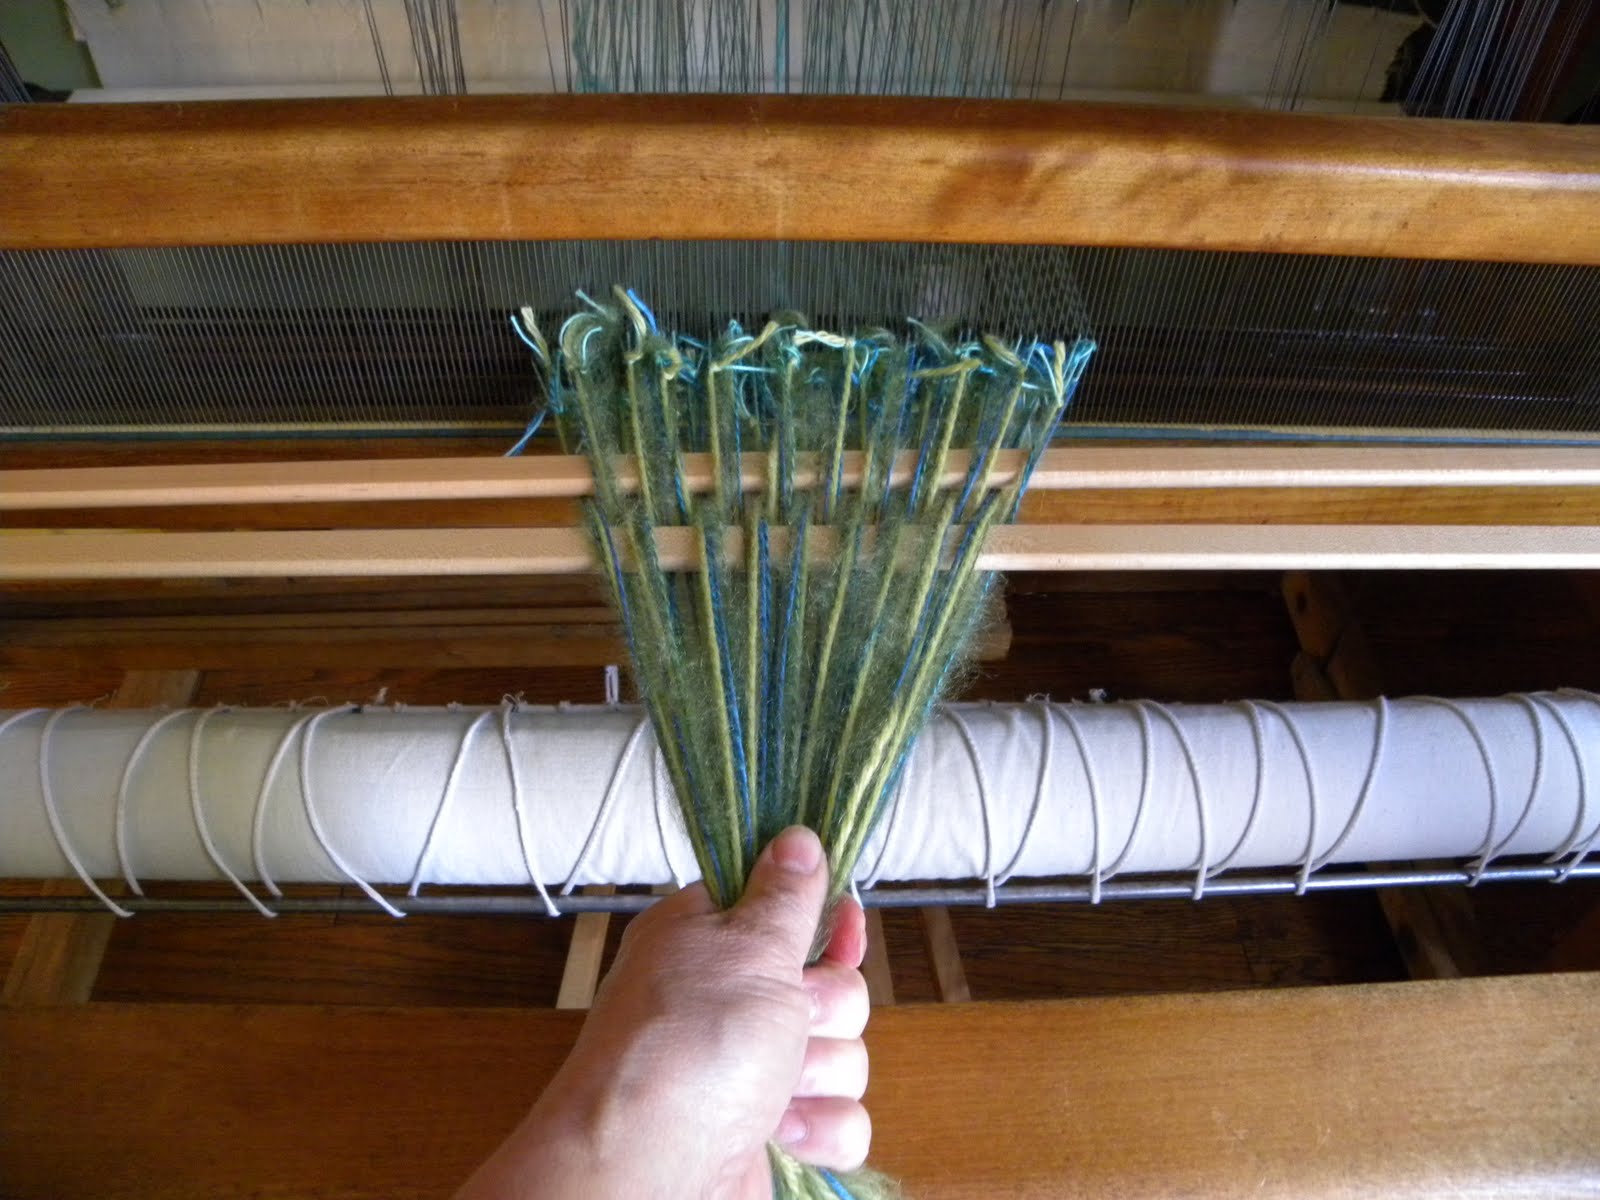
Now tighten things up a bit so that the knots are just in front of the reed. See how mine are a bit (a lot) crooked. It makes the next step nerve wracking. Take the warp in your left hand, pull some tension onto it. With your right hand, snap the reed over the knots. With any luck (and I had some for a change) all the knots will be on the far side of the reed now. That is, between the reed and the heddles.

Wind the pseudo warp onto the back beam. Don't worry about paper on it yet, that's in a minute or so. Wind until the knots are just before the heddles. Make sure nothing is snarled yet. If it is a sticky warp, as in mohair, then for sure, do this.

Crank the back beam a little at a time until all knots are safely through all heddles. If anything un-ties, give it a tie back up, but if the warp made it through the reed, this is unlikely.

Pause. It is time for the cool working with a sticky warp trick that Janet showed us.

First, weigh down your lams so that shed 1 & 3 are up, 2 & 4 are down. Wedge something into the lams to hold this. Janet used her boot. I used a stool.

Taking the warp in small groups in your left hand. The shed for plain weave is now open at the heddles, you can see a space where your shuttle will go, but it's a bit of a mess, right?

Using your right hand, sweep through the shed from in front of the reed aaaaaallllllll the way to the end of the warp.

Yup, undo that thing you do to keep your warp from splaying all over the floor and sweep down it, using your hand to separated the threads into up and down. Next group, same thing. From past experience, I recommend you don't wear shoes with buckles. Birkenstocks for example, are known to get tangled in warps on the floors. I now do all my loom preparation in socks.

Once all the warp threads are nicely separated into up and down, then you can start to crank that back beam. Slip in your paper or laths as usual. Tug on the paper to add tension as you go. The warp traveling through the reed and all those heddles, plus the occasional tug on the paper will create tension enough, says Janet. There were about 15 witnesses to the fact that this is, indeed, all that was done to create tension.

Once the warp is up and over the breast beam, your normal spot to begin tying on to the breast beam, take the time to give the ends of the warp a little haircut.

And now, the big reveal. WHY would you change your habits?

On the left, the waste from tying the knots at the beginning of the process. On the left, the waste from trimming the warp before tie up. THIS is why you want to experiment with a psuedo warp. Just look at the savings! Think how many metres of threads get lost in that distance between the back beam and the heddles in those final few inches of weaving. Gone. This is the entire amount of waste you will have. Who says this is only useful for expensive threads? My cheap Dutch blood was thrilled to bits. I bet those of you with Scottish ancestry will go nuts with glee.


Tie up, weave. Gloat in the savings.

Thursday, September 23, 2010

ZE day, that wasn't so bad

Really, that wasn't so bad.

Luckily, all the laundry had been caught up enough that I didn't have to make good my intentions to do a load of laundry in the sink in cold water. We've been to cottages and camping enough for me to know that washing ones' own and one's beloved's underpants is generally cause for tension. It can be done but it ain't that good for the soul.

I had a cold sponge bath, I didn't turn on any lights until well into the day, didn't listen to music but did play my recorder. There was one moment of complete forgetfulness when I sat down while the dinner was cooking and turned on the TV but quickly remembered that I had pledged to read.

Earlier in the day I had a crisis of conscience. I had determined that I would work on the loom, putting on a new project. I have this new thing called a Trapeze that allows a single person to get the warp onto the loom without messing up the tension. Ordinarily I would have to bribe a child to come home for dinner in exchange for holding the warp while I wind it on to the loom. I took a course on how to do this back in April and the one time I attempted it back at home, it was an unholy disaster. The crisis was that I have excellent instructional photos on my computer and I had pledged not to turn it on.

I paced around a bit, did some distracting chores and had an argument that went something like this;
"You (meaning me) can't turn the computer on, that would be cheating."
"Yeah, but that means you (meaning me) can't get any work done, no writing because the computer is off, no weaving because...the computer is off."
"There must be something else that you could do that is still in the nature of studio work that doesn't involve the computer."
"You could spin, but that's really leisure time stuff. In order for this experiment to work, you should be exploring be how to consolidate work that involves a plug versus work that doesn't involve a plug. Going off to knit or spin isn't working."
"......"
"Turn the bloody thing on and get to work!"

So I did. I felt bad about it all day long. Maybe I should have been better prepared, maybe I should have printed those images into a booklet so I don't have to keep returning to the computer. No conclusions were reached about this breach of pledge.

I went to the Sustainability class to see how the students responded.

Many of them took the bus to school, or walked, several took cold showers, several were writing their notes for the day and a few had done alternative things that weren't given discussion time. The professors had the lights in the room dimmed and gave up 15 mintues of lecture time for discussion.

One of the students, on the on-line discussion board had made a comment along the lines that doing something symbolic once a year was a waste of everyone's time and focus and why not get together and sing "Kumbya"? Steve decided that this was a challenge so he found the music and offered to sing "Kumbya" with any student who wanted to. Kate and Hailey (I might have the wrong name there) were the only two brave souls, but they did it! And I laughed.

That night Steve and I explored how to have a relaxing evening without the TV or music playing. We went for a walk around the neighbourhood and did the dishes together (in cold water)(the dishes were in the water, we weren't) The banjo/recorder duet attempt turned into a guitar/recorder duet and had its amusing moments. Steve is very quick at sight reading, so he was able to read the Baroque music I had found much faster than I could and when he switched to playing chords, I became completely lost. I couldn't figure out the chord changes in relation to the melody and so we switched to some blue grass kind of music. We had attempted this duet business last winter so I had seen the music before. Still, I was slower and not clear on the chord changes relative to the melodies. Things became stormy. Actually, I became stormy.

We shifted to making tea and coffee and reading or knitting. We had a discussion on how does a person take the day's experiences and experiments and move them alongside for the rest of the year or life. As I mentioned, we have done many of the easy things to reduce footprints. That means we are looking at tough life style changes. It is clear that because our whole society is very plugged in, it is very difficult to get paying work done without a computer. We survived nicely without the cell phone or any other hand-held devices so that will remain off our things to own. The most logical next step for us is to determine if a solar water heater is the way to change up how we heat water for showers etc. After awhile we switched to the read aloud book we had decided upon. We were sure we had the second book in the Arthur Ransome series Swallows and Amazons but couldn't find it. We then looked for Jungle Book by Rudyard Kipling but that seems to be in the attic. Don't go there after dark if you value your life. We settled on Centerburg Tales by Robert McCloskey. Short stories about Homer Price's life in 1950's middle America, rather soft but amusing, nostalgic-ish and not too challenging for the end of the day. When we look for read alouds they don't have to be childrens books but they can't be a lot of work. The reader is usually tired by day's end and the listener is usually asleep. That would be me. I think I snored.
'

Saturday, January 2, 2010

Sweet Little Spinning Wheel


Here's the spinning wheel photo I promised. It's called “The Herring Spinning Wheel” and was produced by Frank Herring and Sons from Dorchester, Dorset, England. It is made using a bent wood construction process. The design is elegant and the curves are known as “sweet” in the boat building world. It is very Scandinavian in it's aesthetic and so Mod! It's only failing is that it does not compact down for travel but I can live with that. I came by it in a rather extraordinary way.

The local spinning group used to meet at a lady's home down the road. She has an enormous living room and we could fit about 10 ladies in there, each with their spinning wheel and coffee mug. Spinning of wheels and tongues would ensue. It was great fun but eventually, too many people cottoned on, we outgrew the space and things have since moved to Scott Manor House in Bedford, one Saturday a month. Check out ASH if you want to know more at http://www.parl.ns.ca/ash

About a year ago, I was sitting there trying to spin on my drop spindle (which I forgot to photograph) with little success. I wasn't really joining this group for spinning reasons, more because each of them is also a weaver and the only way I could connect with very smart weavers was to come to this event and spin. The drop spindle was a prop. A fake. I could care less. I was using batting that had felted up and wouldn't yield easily to being spun. I just jollied along, hoping no one would notice and kept asking my weaving questions. One day, a new comer from Scotland was sitting opposite me and she observed my failing efforts. In a leap of kindness, she handed over about 3 metres of lovely merino batt and showed me how to do things properly. And because I didn't want to be caught in my deception, I did what she said. A few weeks later, in she trots with this lovely little spinning wheel and announces to the group, “This wheel is free to a spinner who doesn't have a spinning wheel. I hope everyone is honest and doesn't take it if you already have one. I received it from an elderly lady in Scotland, free to me on the condition that I pass it along to someone who is wheel-less”. All heads turned my way. “That would be me” I said and found myself the owner of this lovely wheel.

Not only was I impressed with this generous act, I was impressed with the idea that the wheel was making an impact in the realm of passing on a craft. A nearly non-conditional gift meant that I could stop faking it and really get to know the roots of my craft, weaving and textile arts. I could learn where the initial resource, the fleece, came from, how it was processed and eventually how it lands in my lap in the form of knitting yarn (sweaters), or weaving yarn (cloth), or embroidery yarn (ornament).

I had only two things to do, learn how to spin, and pass it on. Since that day I have managed the first and plan on the second. I had to laugh in that Steve, who seems unable to fail at anything besides the game “Memory”

was able to make the spinning wheel work before I could.


You have seen the first grey/taupe fleece that I have spun and I am now working on the oatmeal-y fleece from the next sheep. Over Christmas I found a small bit of batt from a friend's stash that ended up in mine when she purged her collection. That was great fun to work on because it was already dyed and resulted in a multi-coloured yarn.

I figured the approximate time it takes to get this fleece from sheep back to human back. The sheering – 10 minutes (recovery time for sheep unknown), washing of fleece in basement – 3 hours (this included while waiting for the different steps to conclude: dusting the basement after the radiator covers were sanded for staining, putting away the summer camping equipment, and dusting off the jars in the root cellar (? I know)), carding the fleece – 5 hours over the course of several days to avoid shoulder injury. Unfortunately one can't multi-task during carding because the carder makes a racket and it is impossible to listen to an improving audio book, or any kind of audio at all, including the ringing of the phone. I am not sure how long the spinning will take, probably about 10 hours over the winter. The knitting should take about 2 years given my usual attention span and this includes knitting a portion of the sweater twice because I always end up ripping something back to the beginning. All in, the sweater takes about 30 hours and 15 minutes.

I find this astonishing. 30 hours per large garment ! Women did this sort of work endlessly before the Industrial Era began and to think that some women did this to earn extra or primary income for their families! They did this while (maybe not while, that could be dangerous but you get the idea) cooking on wood or coal fired cooking devices, washing clothes by hand, emptying chamber pots and let's not mention the mayhem caused by various stages of reproductive events. Just imagine if you had to clothe your own family of 3.5 people by hand, knitting only. You wouldn't have to sew any garments, or household linens, just concentrate on knitted items.

Go through your own closet, sock and stockings drawer, the mitten basket at the front door, your kids clothes made now of plastic (which would have been wool items before) and think about how many hand hours those would have taken. Is it any wonder closets were smaller in the old days? No one could afford the time it would take to knit all that. Is it any wonder a kid would freak out if a mitten went missing? Mom would have something stern to say about that.

On the one hand I am grateful to the Industrial Age so that I don't have to do this endlessly. I am also grateful that wool is processed by someone else, otherwise all the socks and mitts and Christmas gifts would never materialize. On the other hand, I am somewhat saddened that many of us don't appreciate the incredible dedication hand made items do take and how we treat them so indifferently in our culture. As usual, a balance needs to be struck between the romanticizing of the past (I'm prone to it), blindly thinking a sustainable future means a return to hand made items and recognizing that certain industrial practices, with clever interventions, can become less careless of the environment and the workers within an industry. The balance will ultimately come when we recognize that to do things in a thoughtful, harmfree way, we will no longer be able to pay $12.00 for a men's large sweater at a discount store, nor will we be able to afford to pay what it really costs to make a garment and treat it like a kleenex.

All this from the sweetest little spinning wheel I ever saw.